


James x428
My year-long hiatus has gotten my fervor up for pushing my pre-established boundaries, and my recent works have been more gratifying than ever. Rethinking is the key to growth. James is so innovative that I created a new experimental class, allowing me to be free of constraints and to give myself permission to have a lot of fun along the way.
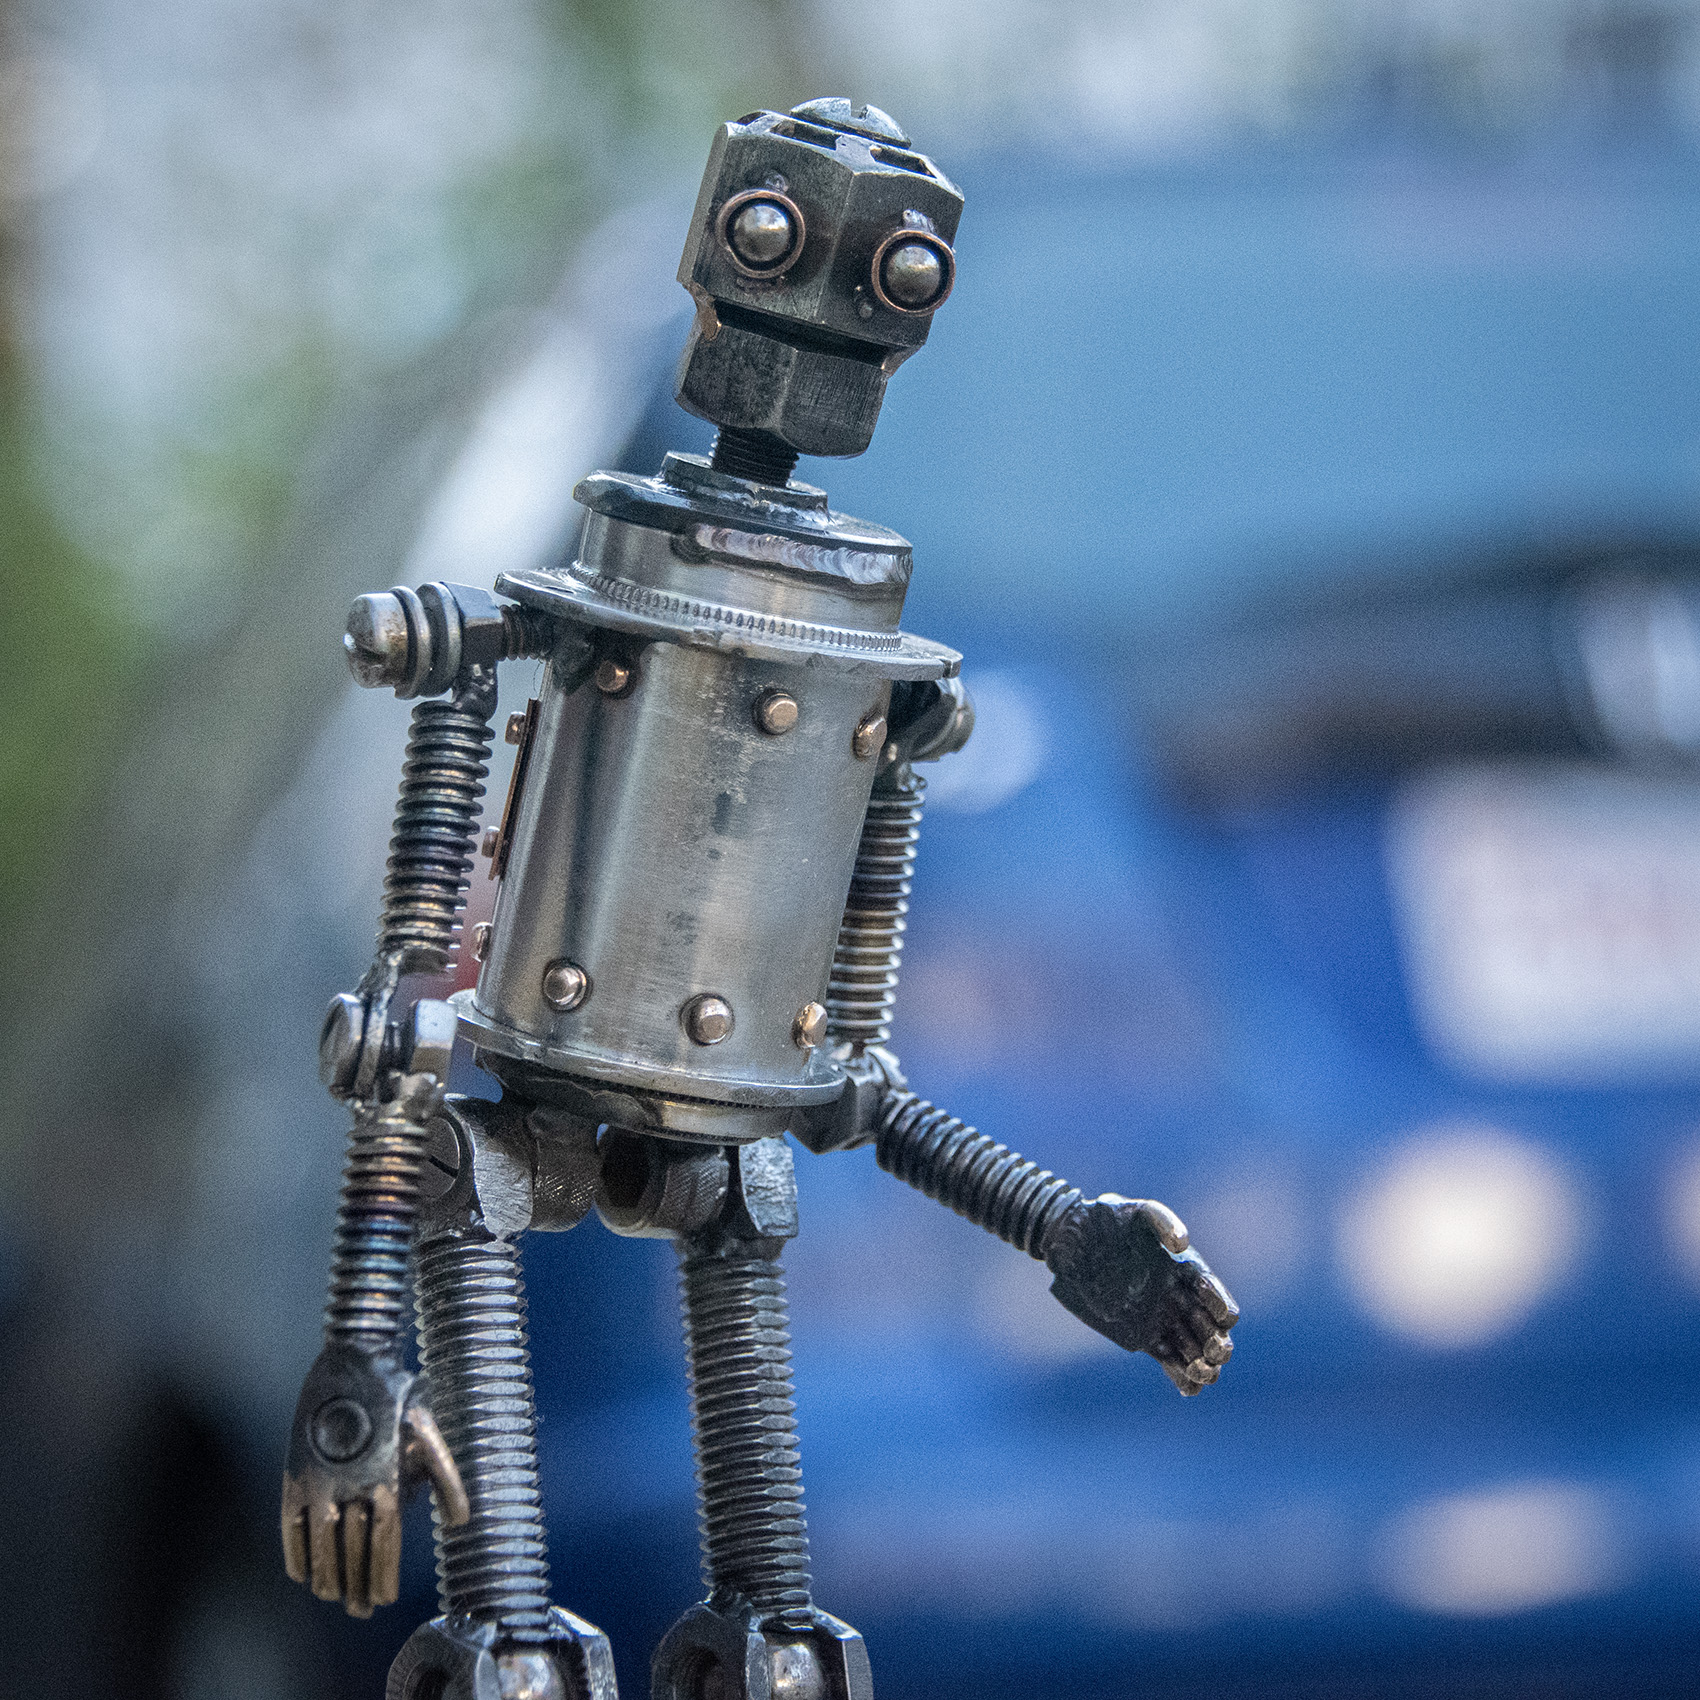
One of the first things I decided to experiment with on James was to try to rethink the shoulders and hips of the torso. I’ve used the same coaster brake bicycle hubs for hundreds of robots. It’s a great piece of metal that works well for what I’m trying to do, but it’s not how people are shaped. How can I form it into something more human? I’ve tried squishing the hub in a vise but it wouldn’t budge. I may try the hydraulic press sometime but I suspect it may just mangle the part instead of shaping it the way I’m looking for.
While the cylindrical part of bicycle hubs are not very formable, the flanges are. I was able to hack saw and file the flanges so they are wide at the shoulders and hips, and narrower in the front and the back. I believe this to be a helpful evolution and will most likely be used in future work.
Experimenting with simple joints
James was originally going to be an improved version of the Dionysian line, with loose, ragdoll style joints. The process began with a washer and bolt-style rotating joint, but after some playful experimentation, I realized I could do a lot by welding parts to a nut and a machine screw to make a nice shoulder joint. Adding a split washer allows for some optional friction – by spinning the arms around once, they can go from loose to pose-able.
For the elbow joints, there needs to be a hard stop when the arm is fully extended. For the first elbow I made – the right one – I added some tiny blobs of metal to the joint with the TIG torch. For the left elbow I used the shape of the split washers to act as the hard stop. Both techniques seem to work well, and I’m excited for James to have a few subtle differences for people to discover on their own.
This new joint style is compact, and can be scaled to any size needed for any sized robot. This comes at a cost of not being as serviceable as the joints on Proteus Class robots. While they are strong, moving parts can be overstressed under extreme circumstances. I like making robots to last the ages, so I like to think way ahead. If a shoulder joint or an arm joint becomes locked or loose, perhaps it will add to the charm of the robot. James has very strong joints for his size so I’m guessing it shouldn’t be an issue for a few hundred years.
I considered the possibilities of the James’ articulation for the lower half of his body, opting for a simple and reliable choice: fixed knees and ankles, with hinge joint hips. Starting with a square nut and a hex machine screw, I reshaped the joints by rounding off two points of the nut and hacksawing a fake screwdriver slot to the bolt to add some detail. I welded the legs onto James in such a way that he can’t bend his legs backwards very far because the leg nut socks down onto the hip screw at just the right spot for the left leg. This same technique doesn’t work with the right leg – unless you have left handed threads. I opted to have the shape of the square nut act as a stop against the torso. James has quite a few subtly asymmetric joint designs!
I did my best to make the knee and ankle joints look like they could bend. In fact I have fooled myself many times on photo sessions with James, absentmindedly trying to pose him in ways he won’t pose. Should I feel proud for fooling my myself? The thought makes my chuckle.
James’ shoes are made from leftover coped ends of some 4130 tubing ends from a summer project of mine. One shoe was made with a hole saw, the other was made with a hacksaw and file to try and mimic the first one. The steel got hard to hold in the vise after as it took it’s irregular shape, so the shoes aren’t absolutely identical. One of the pieces of steel had a little chunk of it missing, which I thought I could easily remedy by welding on another piece. That part of the plan went poorly, so I needed to turn the situation around, and into what artist’s call ‘a happy accident’. In this particular case, I chose copper clad toes to add some fun metal accents to the piece.
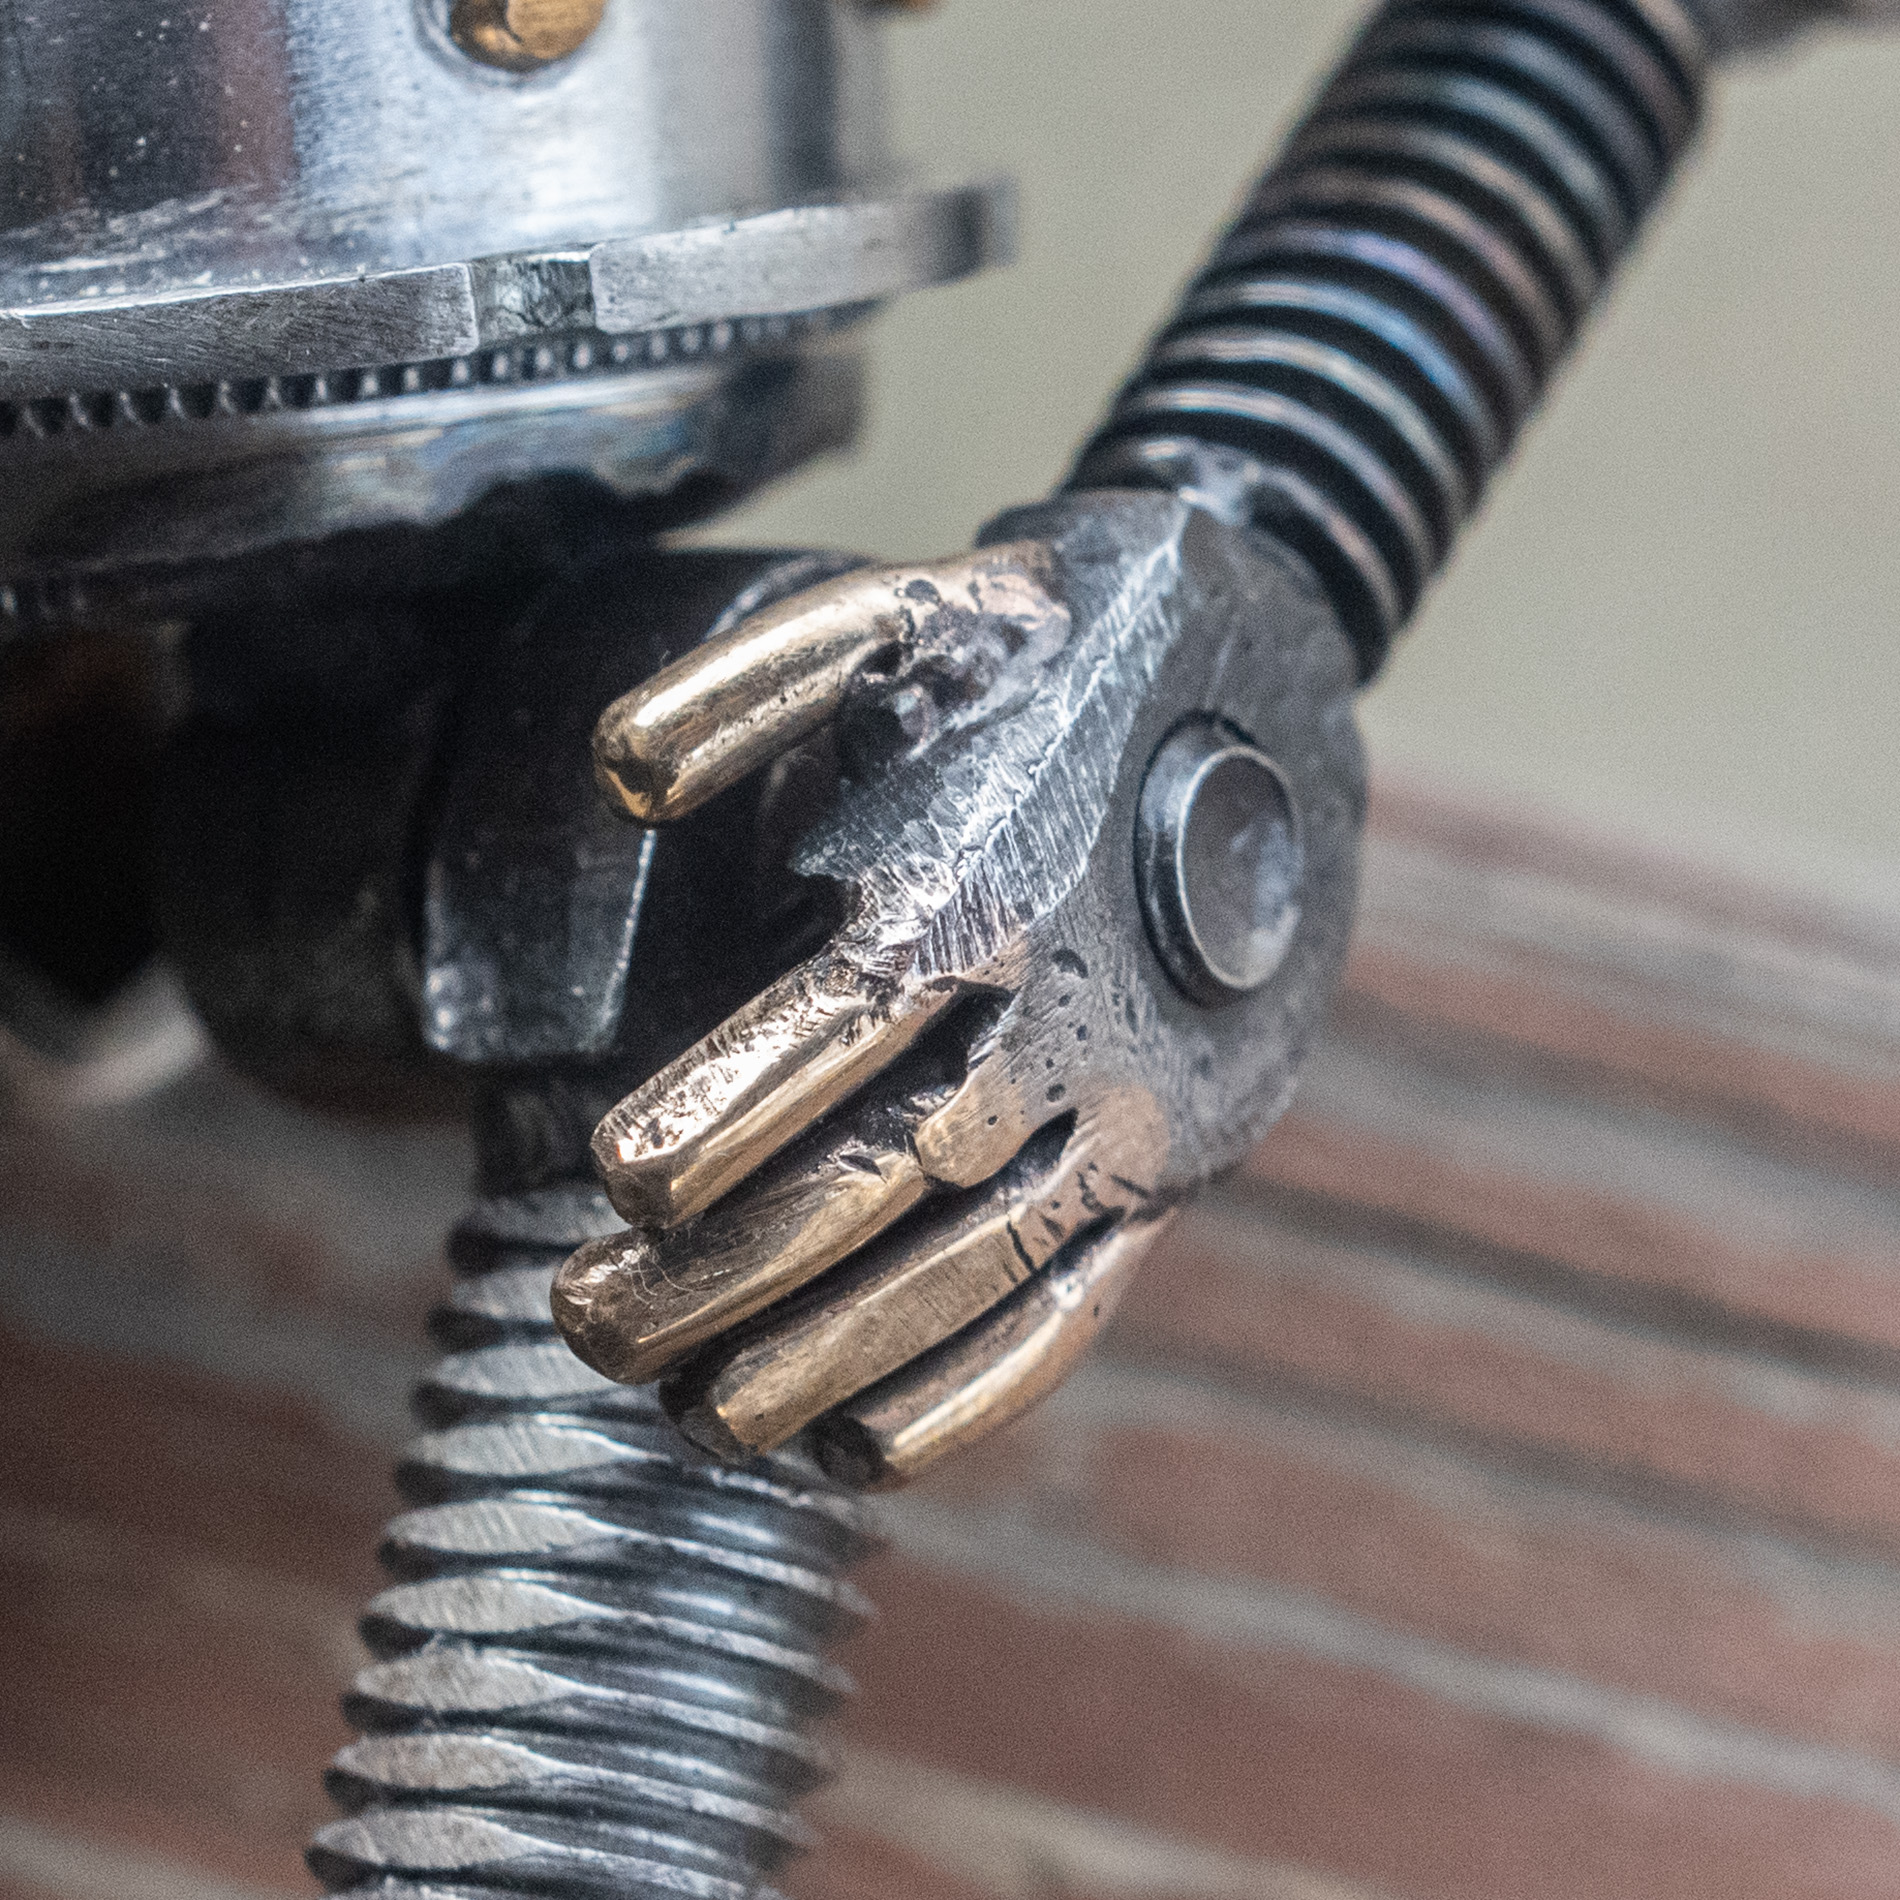
James’ has got some workin’ hands.
James’ ‘Workin’ Hands
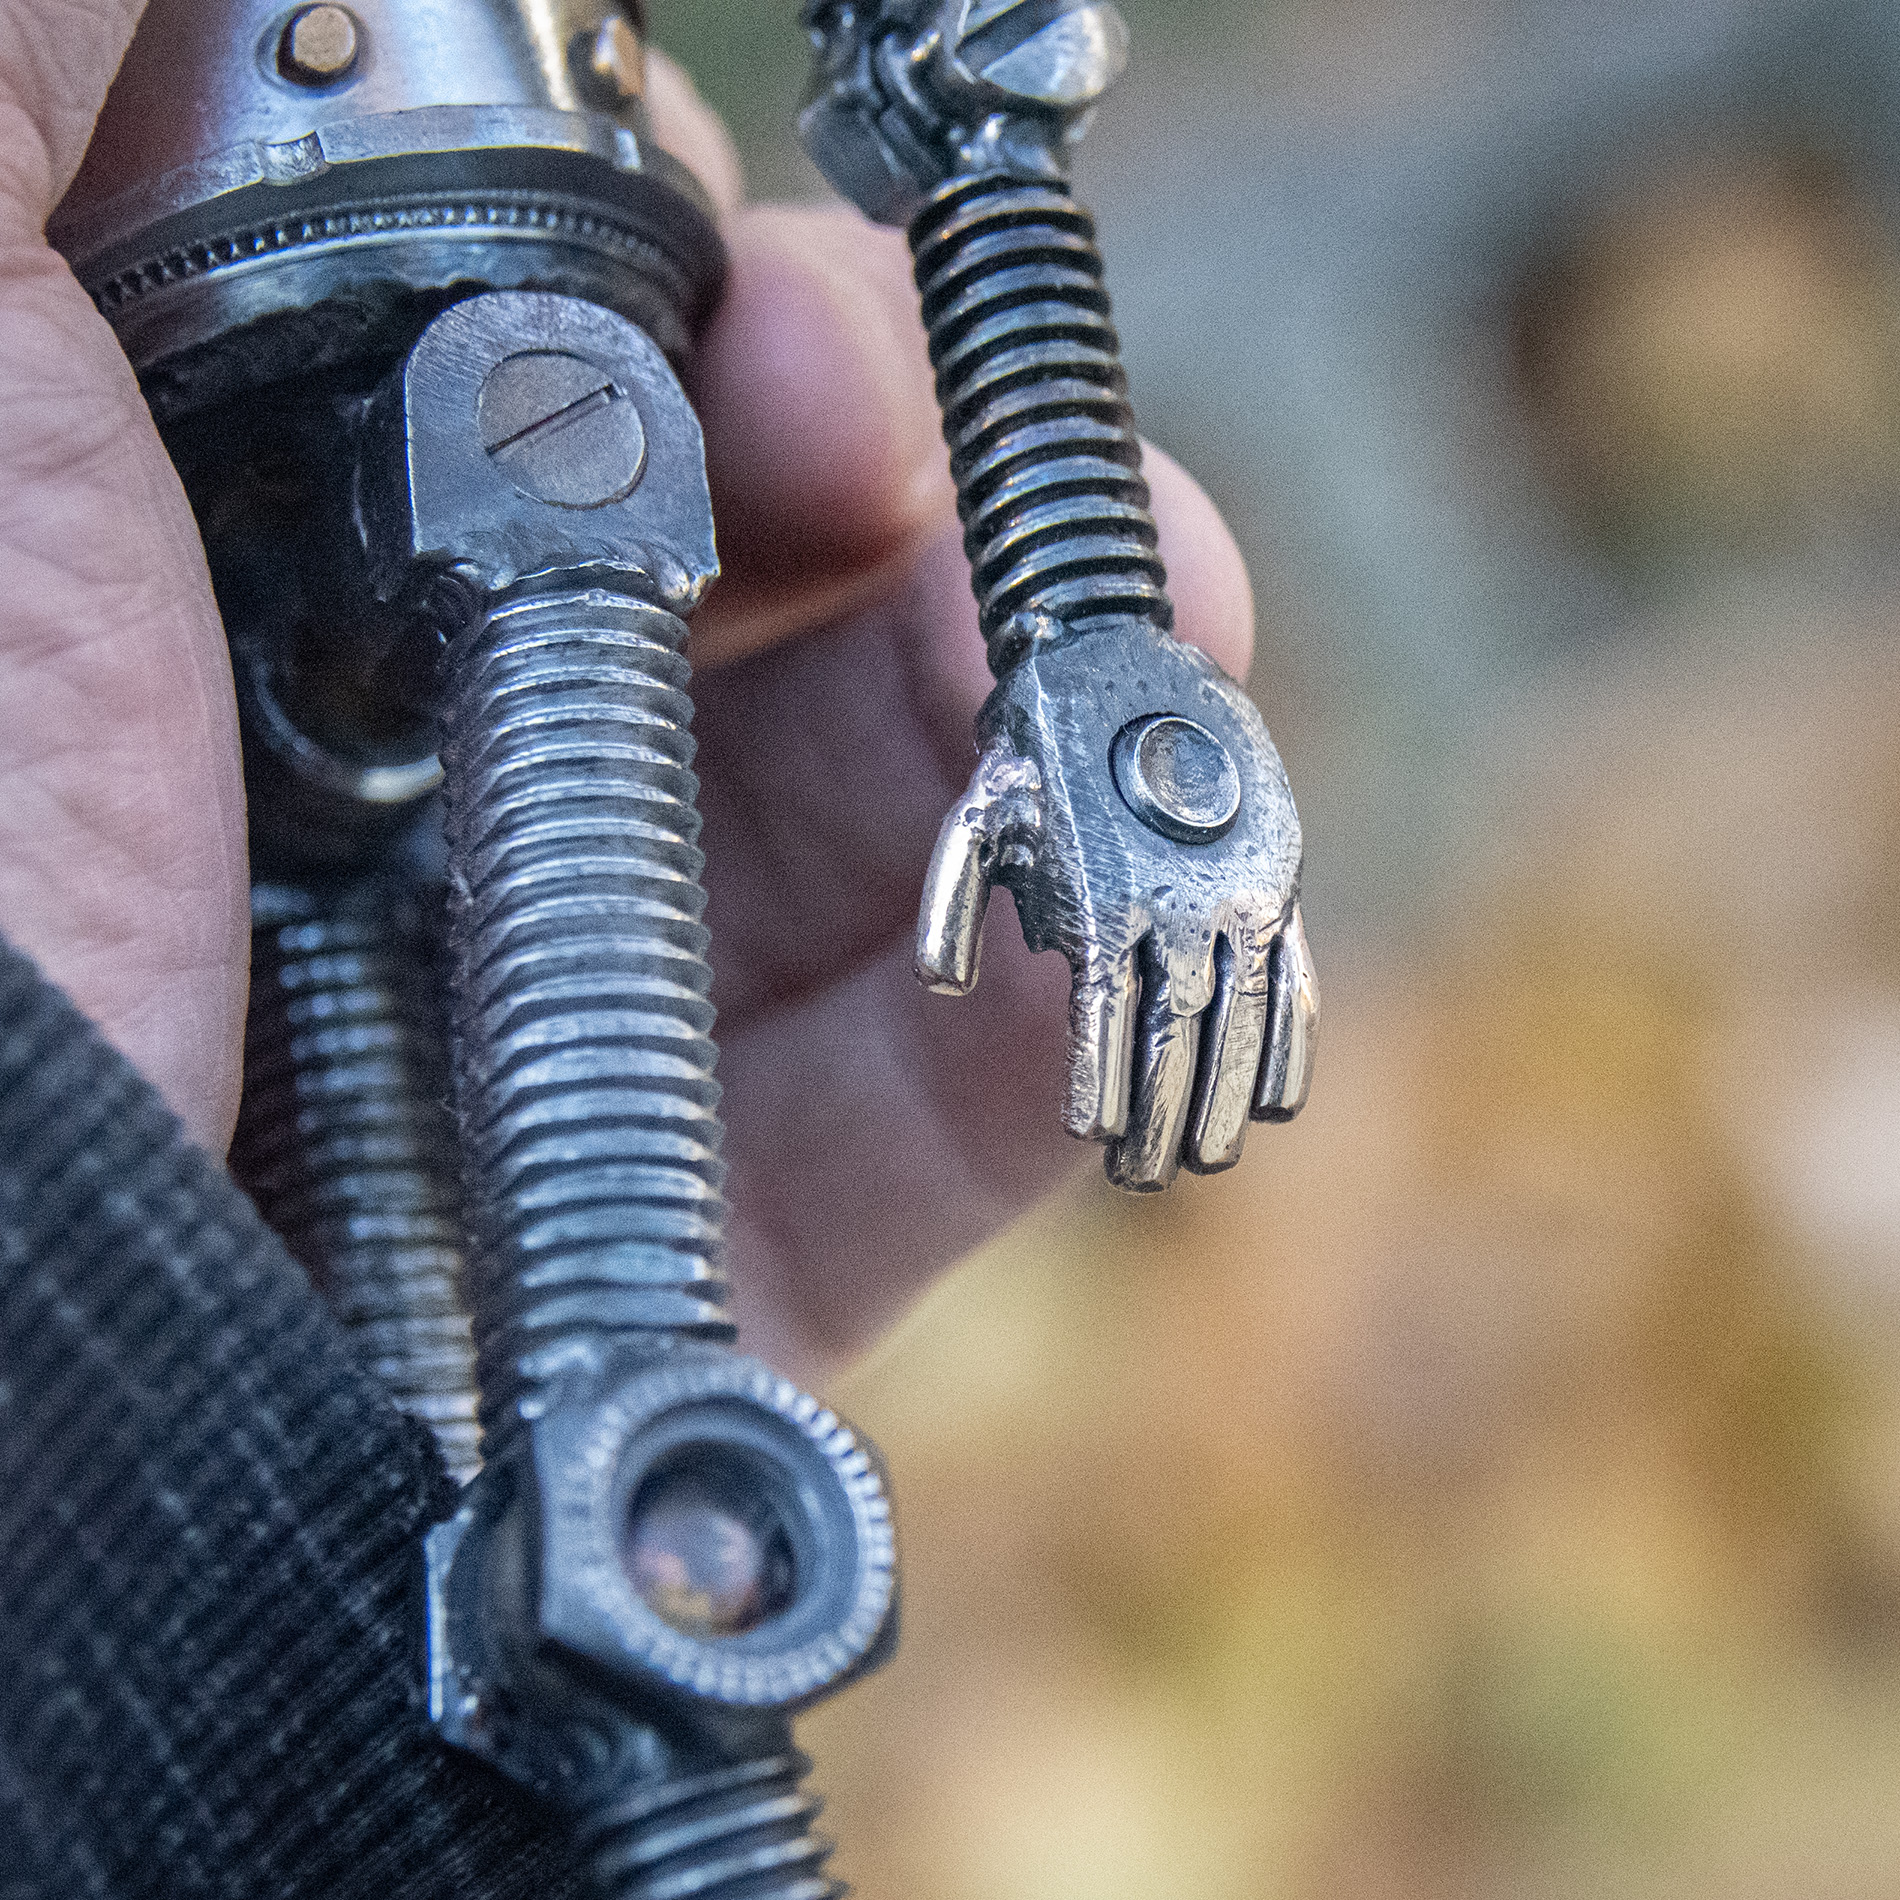
James’ older sister Opal, my previous work, has amazing hands made from discarded square punch blanks, and little snipped pieces of stainless steel bicycle spokes. Working steel that hard on metal that small was a big challenge, but the effort was well worth it. For this piece I needed to scale things up slightly, which is easy to do with a 3d print, but not so much when pallete is comprised entirely of specifically-sized and specifically-shaped pieces of old machine parts. Suddenly, after years of dormancy, the box full of various old square nuts in assorted sizes I’ve been squirreling away had found their true calling! This is a significant breakthrough.
In order to make the nut into the palm of a robot’s hand, I needed to to plug the holes in the square nut. I fuse-welded a hacked-down piece of machine screw. I then carefully welded the bronze fingers and thumbs on one at a time, learning a little more each time. Hands have the potential to say so much, I savored this part of the process. Once everything was properly connected, I peered deeply at them using a dorky head-mounted magnifier and heavy scrutiny – reshaping the fingers with tiny files and sandpaper. I also had the perfect excuse to try out the lead hammer for moving the metal while not leaving a dent. It worked, too! The whole time I was working them, I was thinking of how a sculptor’s file strokes can be a lot like a painter’s brush strokes.
Get up on your feet James!
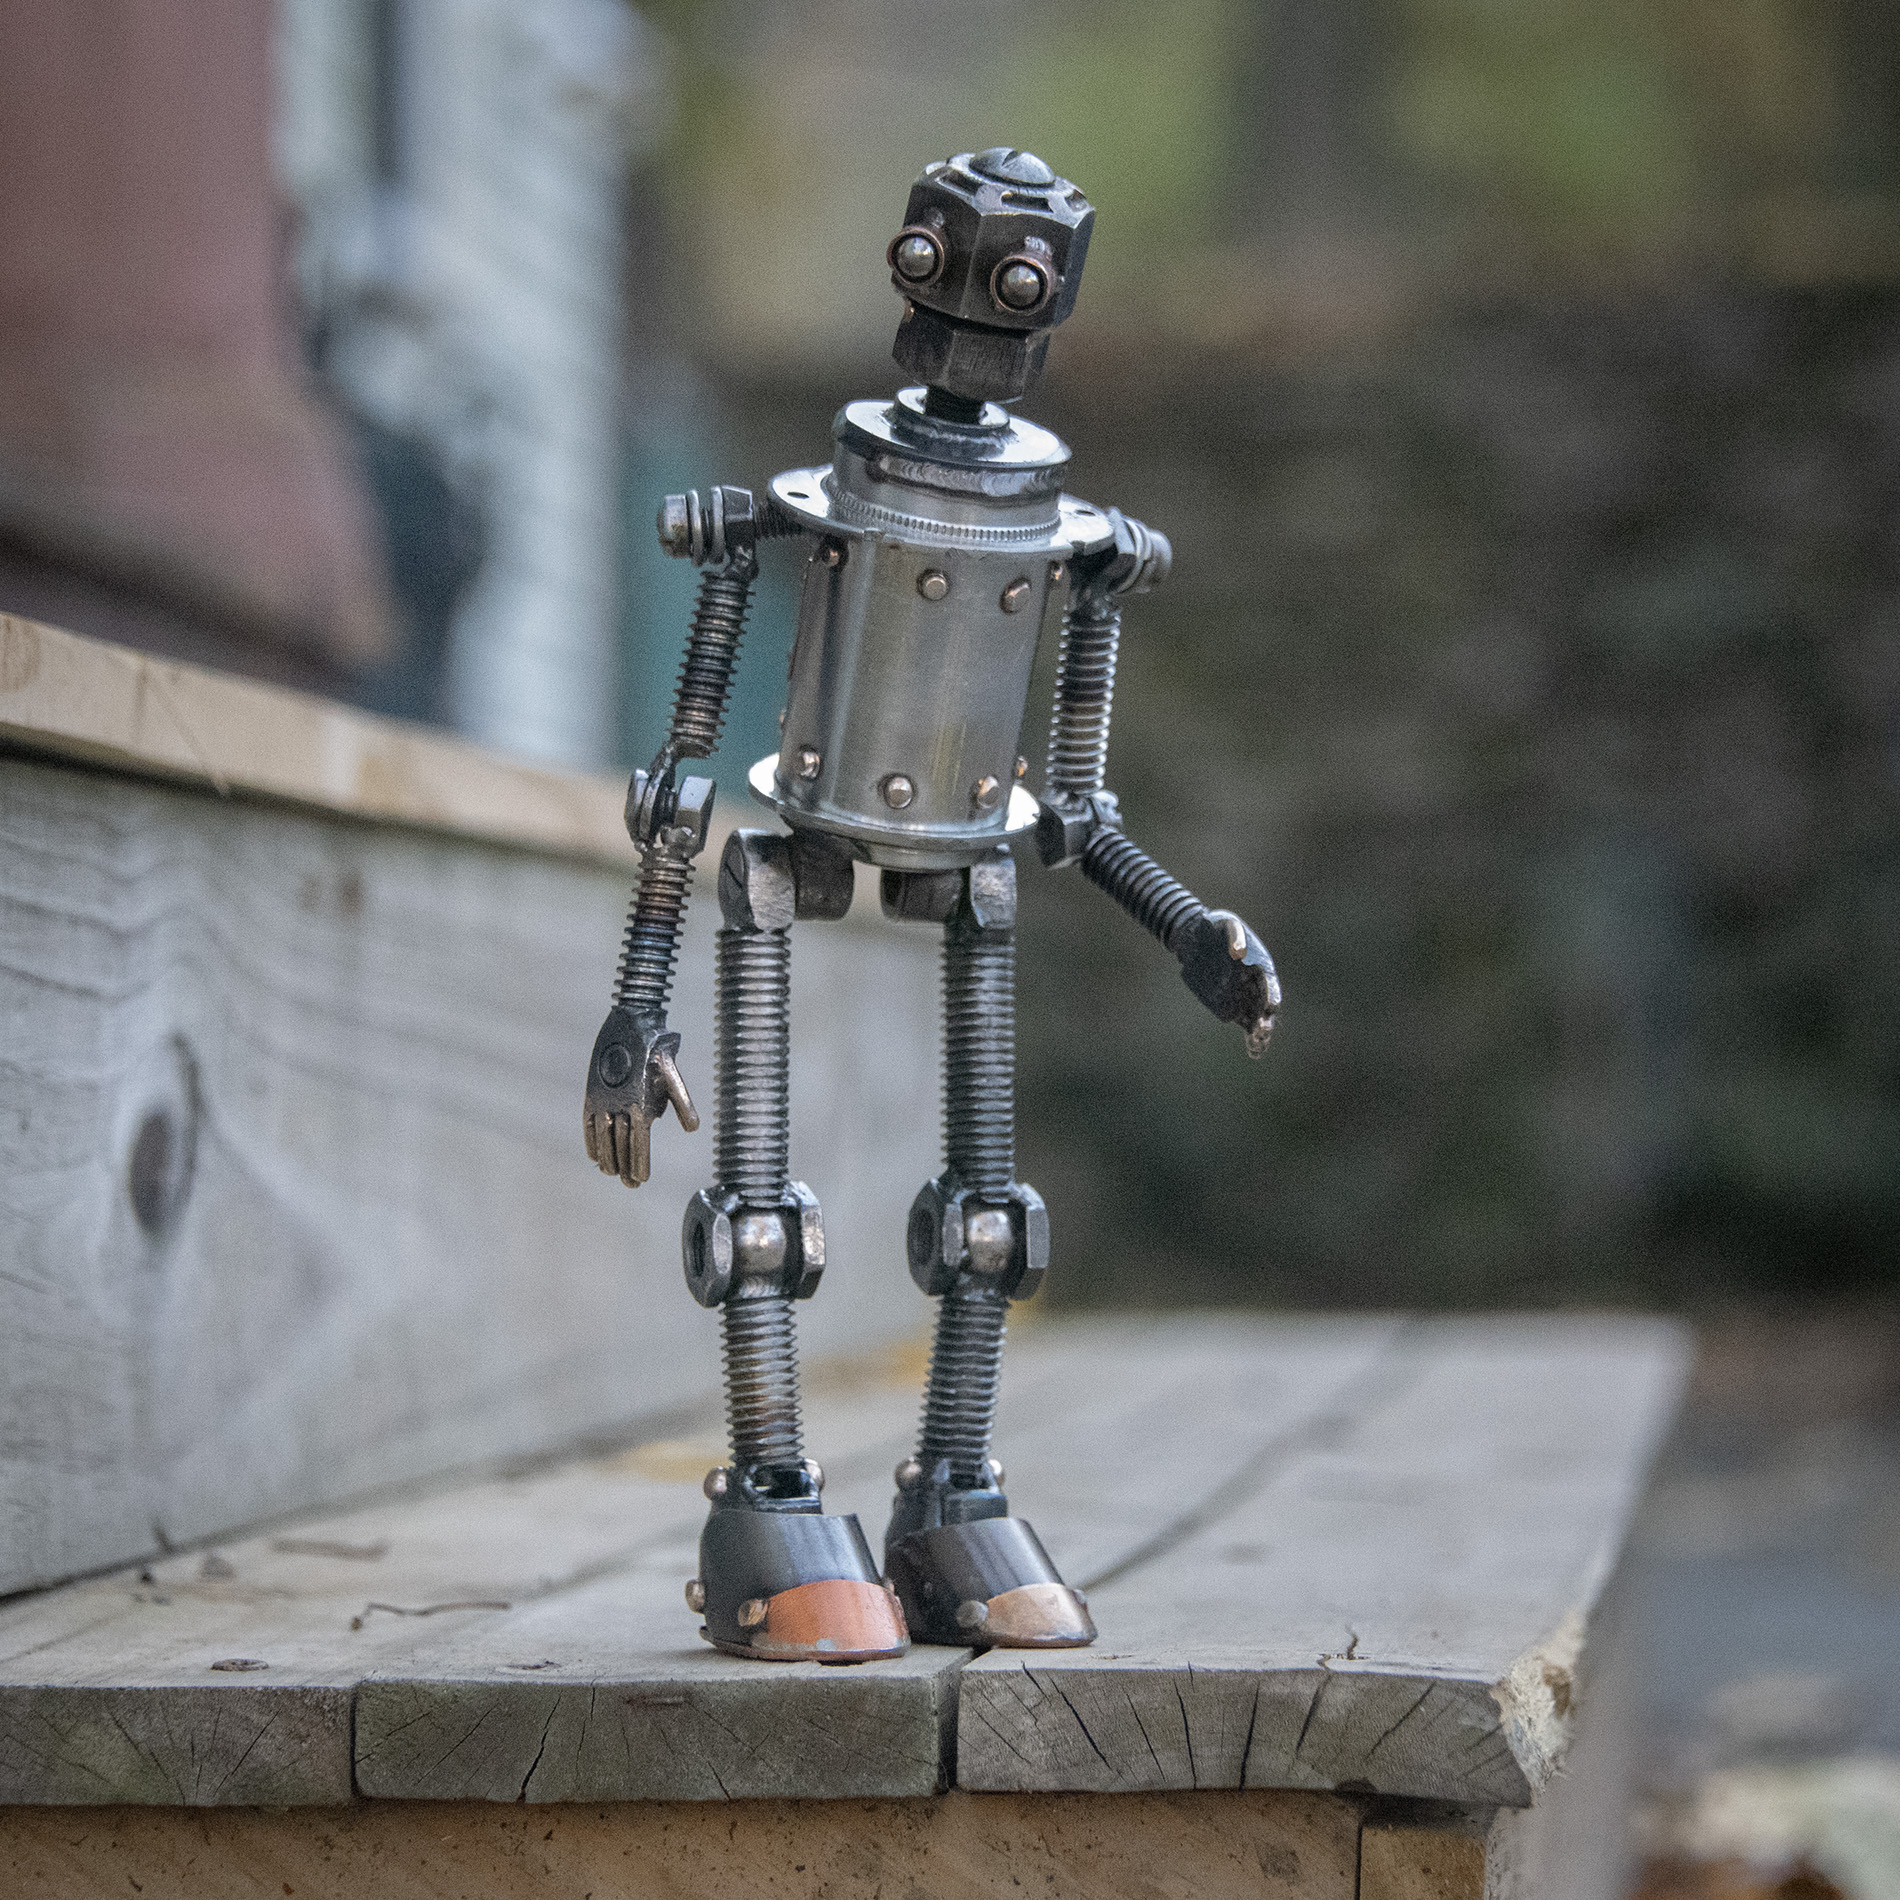
After weeks of scheming, sculpting, welding, and finishing, James had it all-together. It’s a very exciting moment when a new piece stands before me for the first time, staring at it’s creator. I like to give my robots an expression of wonder, and that wondrous look can feel profound at this first moment of scrap metal synergy. A collection of leftover machine parts and scrap metal stares back at you. From almost nothing, something meaningful. After allowing this moment its space, I remembered that James can get down as well as get up. I grabbed the hot metal with my weld gloves on and sat him down – then realized my work was not yet done. His feet had no bottom. In short, James had no soles! Say what?!
There was a part of me, left over from the old ways I thought about process, that was frustrated to be robbed of the endorphins associated with the ‘done’ part of a job well done. But as I get older and wiser, I realized that this was just another opportunity to have some more fun with the piece. Instead of rushing out a good-enough solution for something as mundane as the bottoms of feet, I thought of it as another opportunity to experiment. James’ birthday will have to wait for the cobbler to come up with something.
I chose copper plate to match the shoe tips: scribed to match the feet and cut with a hacksaw, Tread was carefully grooved by hand with a hacksaw. The blade slipped on the slick copper a couple of times, which I’m okay with since his boots should be scuffed from use anyway. After welding the plates onto James feet, I was sure to leave the bottoms of the shoes dark and scuffed.
Copper tends to turn all kinds of amazing colors when heated up; and while they are beautiful, they can be difficult to create purposely with a TIG torch and even more difficult to keep once they appear. Copper loves to oxidize as most readers are aware. Clear coating puts a barrier between the metal and the atmosphere. However even after that barrier has been added, there’s still some oxygen present so the oxidation continues for a short time afterwards. James’ toes had two very different colors before clear coat – I was excited to see if I could lock the colors down so as soon as it was cool enough, I applied a coat of polyurethane to just his feet. While the contrast has faded as expected, a distinct difference in color is still present. I was able to lock down some very nice colors on James’ back boilerplate. I was also able to lock in some nice blues and golds in the threaded bolts used for his arms and legs. James had many rounds of finish work throughout the process, and the reward was to have full spectrum of surface finishes and metal colors.
Why James?
This experimental robot didn’t have a name picked until his birthday. My first impression of him as a whole was a quiet, reserved sort of fellow. Funny thing is, when I stood him up on his feet for the first time, I realized he could stand on a heel and a toe – making him look like he can dance! The name James seems to have a duality to me – he could be a reserved chaufer, or a tiny robot version of the Godfather of Soul himself.
A New Class of Astrobot
James was an absolute pleasure to make – I have given him my everything for him be the best little robot he can. I plan on making more X-class experimental robots, but James is the first official one. I’ve had a few commissions in the past that I would reclassify in retrospect, but James will always be the one to make it official.
9.5 x 3.25 x 2″
2 lb, 0.7 oz.
$1,400.00